There’s always a bit of hesitation in sharing the camera settings for use for epic landscapes. After all, no two scenes are ever quite the same, and settings are only part of the story. But if these insights can help someone on their photography journey, then it’s worth putting them out there.
For anyone diving into landscape photography, settings are just one tool to bring a vision to life. There is also light, perspective, timing, editing and a touch of stubborn patience do the rest.
Here are some of my favourite landscape captures and the settings used – from sunrise summits to dusky lakes to give a practical sense of how different time of day and conditions shape each image.
This post may contain affiliate links. Your purchase through these links supports me with a commission, at no added expense to you.
SCENE: SUNRISE
Location: Dukes Nose, New Zealand
Camera: Canon R6
Lens: RF 24-105mm f/4-7.1 IS STM
Zoom: 24mm
Aperture: f/6.3
Shutter Speed: 1/250
ISO: 200
Focus: Auto-focus
Notes: Getting to Duke’s Nose for sunrise isn’t exactly a walk in the park – it’s a slog up steep inclines and over a large patch of wetlands, but I reckon it’s worth the early alarm. With the sun rising behind, there was enough light to keep ISO low for clarity. The mid-range aperture kept the background sharp while letting the foreground blur slightly, giving the shot some natural depth. If the aperture had been narrower, everything would’ve been in focus but felt a little flat. Undeniably, a bit of blur makes all the difference.
Tip: Additionally, check sunrise times and allow an extra hour to hike in the dark – head torches and strong coffee recommended.

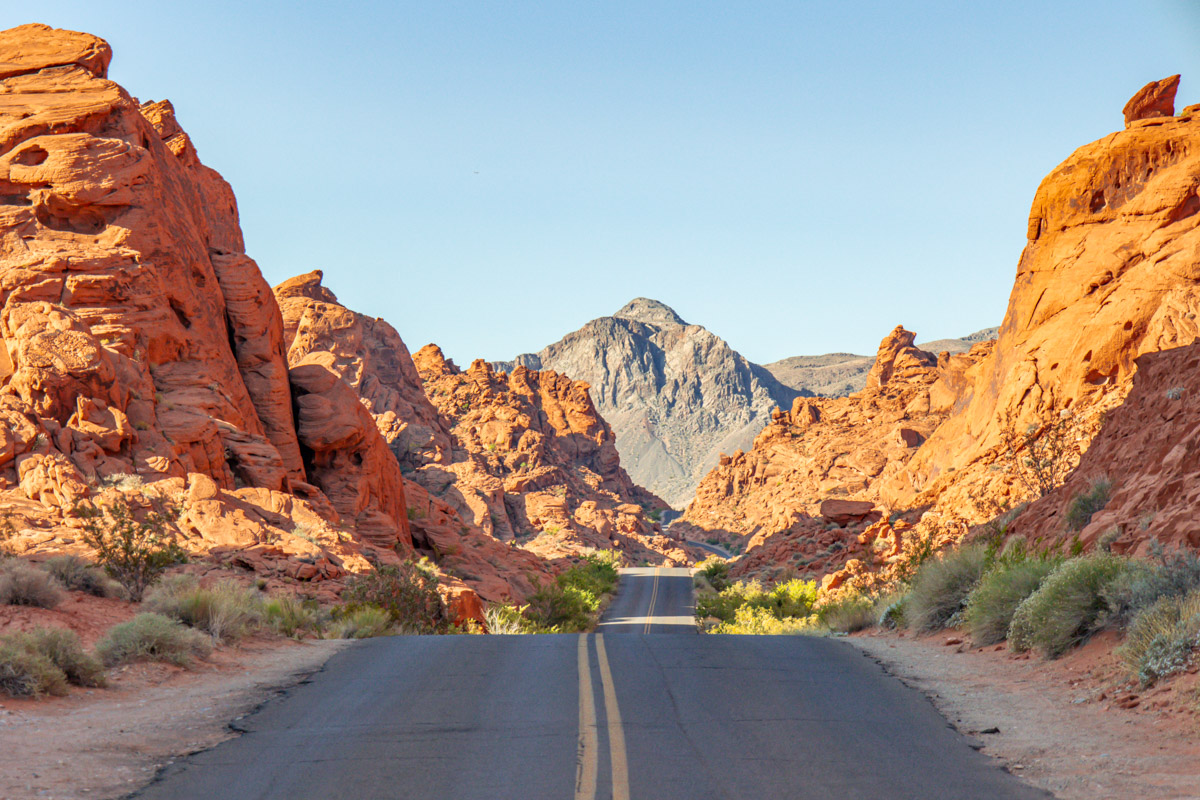
SCENE: MORNING WITH BOTH HARSH LIGHT AND DARK SHADOW
Location: Valley of Fire, Nevada
Camera: Canon R6
Lens: RF 24-105mm f/4-7.1 IS STM
Zoom: 105mm
Aperture: f/7.1
Shutter Speed: 1/800
ISO: 160
Focus: Auto-focus
Notes: This shot in Valley of Fire was all about balancing harsh light with deep shadows. ISO stayed low to avoid adding noise when pulling out shadow detail later, and exposure was set for the bright sky and mountain to keep them from blowing out. The camera settings I use for epic landscapes in tricky light like this significantly helps balance depth of field with ISO for clean shadows. Settings like the f/7.1 aperture gave a good depth of field – the closest bit of road is just slightly out of focus, drawing your eye along the centre line straight to the mountain.
Tip: When framing an image, use leading lines like roads to draw viewers into the landscape and guide the eye to your focal point.
SCENE: LOW LIGHT
Location: Latham Track
Camera: Canon R6
Lens: RF 24-105mm f/4-7.1 IS STM
Zoom: 24mm
Aperture: f/8.0
Shutter Speed: 1/5
ISO: 200
Focus: Auto-focus
Notes: Low light forest scenes can be tricky, but when they work, they’re some of my favourite shots. This one on Latham Track had hardly any light coming through, so ISO was bumped just enough to keep detail without adding too much noise. The mid-range aperture kept most of the scene in focus, and even with a 1/5 shutter speed, I managed to keep it sharp, hand-held. In a scene like this, a tripod would’ve been ideal, but sometimes you’ve just got to improvise with what’s around you.
Tip: When shooting handheld at slow shutter speeds, brace your elbows against your body or a tree for extra stability – or if you have a tripod, even better.

SCENE: MIDDAY
Location: Waewaetorea Island, New Zealand
Camera: Canon R6
Lens: RF 24-105mm f/4-7.1 IS STM
Zoom: 24mm
Aperture: f/10
Shutter Speed: 1/250
ISO: 125
Focus: Auto-focus
Notes: I usually avoid shooting at midday – it’s harsh, and honestly hard to edit in post. But on Waewaetorea Island, it worked in my favour. The significantly strong overhead light turned the water into brilliant blues and greens that you don’t see at golden hour. The camera settings I specifically use for epic landscapes at midday focus on reducing ISO and keeping everything crisp. Also with adjusting to an f/10 aperture meant the whole scene stayed sharp, right out to the horizon. Sometimes, the best thing you can do is work with what you’ve got and find the angle that makes it sing.
Tip: Avoid shooting into direct daylight sun. Instead, direct your camera to another angle. This will help enhance colours and texture rather than wash them out or over-expose your image.

SCENE: SUNSET
Location: Mount Tauhara, New Zealand
Camera: Canon R6
Lens: RF 24-105mm f/4-7.1 IS STM
Zoom: 24mm
Aperture: f/8.0
Shutter Speed: 1/40
ISO: 100
Focus: Auto-focus
Notes: This Mount Tauhara sunset is still one of my favourite views this year. As the sun dipped, I kept ISO at 100 to hang onto those fine details in the shadows. Underexposing the scene a touch helped catch the sun rays and avoided blowing out the highlights, especially within the sky. The camera settings I use for epic landscapes like this help capture richer colours but if there is honestly one thing that I can say – sunsets are a waiting game. Make sure to hang around until the last bits of light fade because that’s when the best colours show up.
Tip: Try underexposing sunsets to bring out richer colours and finer details in post.

SCENE: CLOUDY
Location: Moonscape Overlook of Mount Pennell, Utah
Camera: Canon R6
Lens: RF 24-105mm f/4-7.1 IS STM
Zoom: 26mm
Aperture: f/7.1
Shutter Speed: 1/30
ISO: 320
Focus: Auto-focus
Notes: Cloudy mornings aren’t usually my favourite, but this one gave the landscape a pop of drama and mood that a clear day would have missed. So, when it came to settings I opted for a slightly higher ISO to handle the lower light. This meant that the mid-range aperture kept most of the scene sharp, while still allowing the foreground blur just enough. My shutter speed was sightly slower but I always like to shoot darker than over-expose.
Tip: In fact, sometimes it’s good to embrace cloudy days – softer light often brings out details that harsh sun hides.

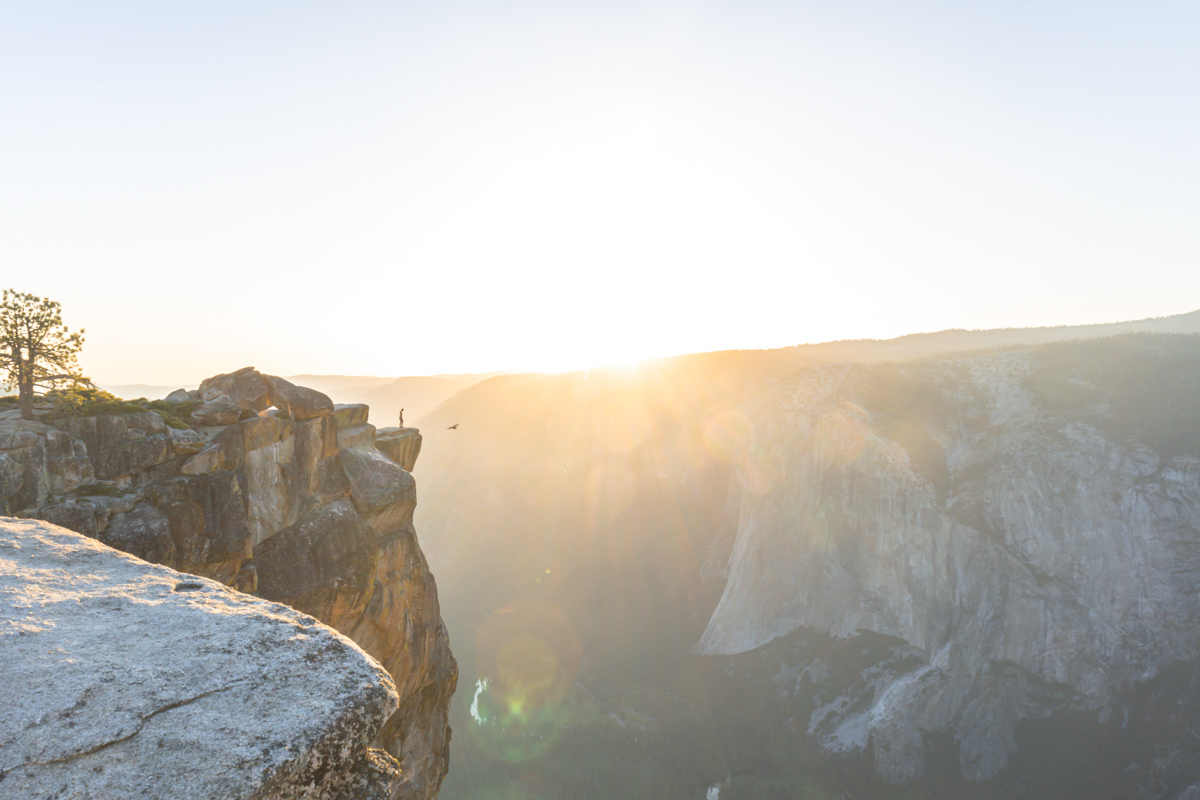
SCENE: EVENING GOLDEN HOUR
Location: Taft Point, Yosemite National Park
Camera: Canon R6
Lens: RF 24-105mm f/4-7.1 IS STM
Zoom: 24mm
Aperture: f/16
Shutter Speed: 1/30
ISO: 200
Focus: Auto-focus
Notes: Shooting directly into the sun at Taft Point was a bit of a gamble. The f/16 aperture probably didn’t do me any favours so next time, I’d drop it down to soften the foreground. However, keeping the ISO low prevented any extra noise, and a slower shutter speed made sure the highlights weren’t completely blown out. This was one of those moments where it was now or never to get this shot and as even though there were so many others around I’m super happy with how it turned out.
Tip: If shooting into direct sunlight, make sure to double check your settings – it may save you a bit of time in post.
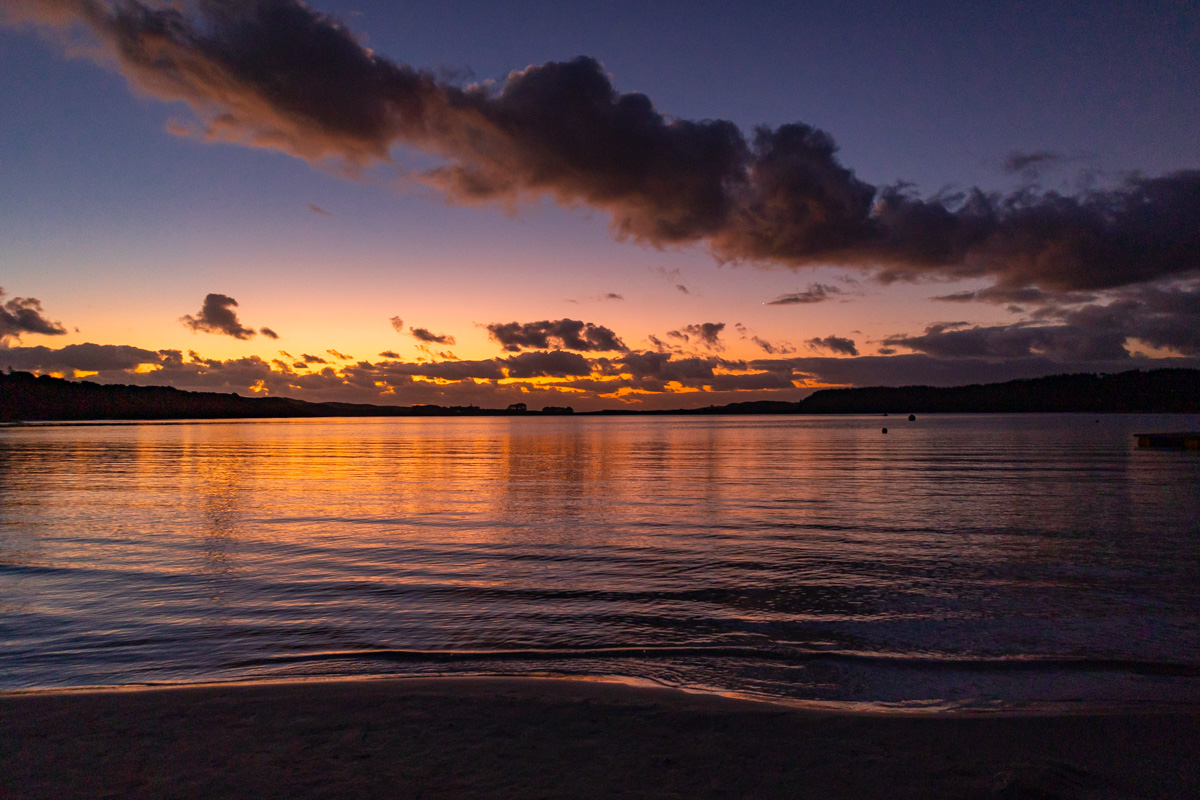
SCENE: DUSK
Location: Lake Takaroa, New Zealand
Camera: Canon R6
Lens: RF 24-105mm f/4-7.1 IS STM
Zoom: 24mm
Aperture: f/4.0
Shutter Speed: 1/160
ISO: 1000
Focus: Auto-focus
Notes: Dusk at Lake Takaroa meant the light I had available was fading fast. I bumped my ISO up to 1000 to keep the shutter speed quick enough for handheld, and the wide f/4 aperture helped pull in the last bit of light. These are the camera settings I use for epic landscapes when chasing the last light of day. Even though some depth of field was lost, it meant the image wasn’t a blurry mess. Sometimes when you’re chasing that last light, you can make some small, quick adjustments to get the shot before it disappears completely.
Tip: Don’t be afraid to increase ISO in low light – modern cameras handle higher ISO far better than older models, and detail is always preferable over motion blur (unless that’s your goal).
SUMMARY
In this post, we’ve explored the camera settings I use for epic landscapes – not as a perfect recipe, but as practical starting points, knowing that settings will shift with each sunrise and stubborn shadow.
These settings worked in these moments, under these skies. Next time, yours might be completely different. And that’s exactly how it should be.
If these insights help take some of the guesswork out of your next shoot, then it’s been worth sharing. And if they spark a little more confidence to experiment in whatever weather comes your way, even better.
For more grounded photography guides, honest travel insights, and landscape spots worth hauling a camera up a mountain for, feel free to explore our comprehensive travel guides And if you’re wanting to build your technical skills even further, Adobe has a brilliant beginner’s guide to landscape photography that dives deeper into the fundamentals.
Or, if you’re craving inspiration closer to home, we also have some of New Zealand’s ultimate destinations here, too.